
This guide can be updated with new versions if the system or process changes.
Please make sure you are reading the last version
For more info contact us at:
(+53) 7 206 9918/19
e-mail: embahamas.havana@gmail.com or yellow_elder@outlook.com
Dear users:
The Ministry of Foreign Affairs of The Bahamas is updating its visa process from manual application to online’s. The online system is still being under programming and going through changes as problems and requirements come up. We understand that there are many doubts and some logistic problems for customers to manage the new system’s requirements as technology is complicated sometimes. Also, customers are used to the old methods and takes time to adapt to new processes. However, development prevails. The Ministry will keep working hard to make the system friendly and adapt it to customers and for each case of visa requirements. The Embassy of The Bahamas in Havana have made this guide to drive you, as much as it is possible, through the application for your visa.
We hope this guide help you!
For e-visa application you will need:
- A computer with internet access
- A scanner
- A flash drive (optional)
1-. THE ONLINE APPLICATION (pre-steps)
Go to the following url: https://mofa.gov.bs/evisa-online-services/
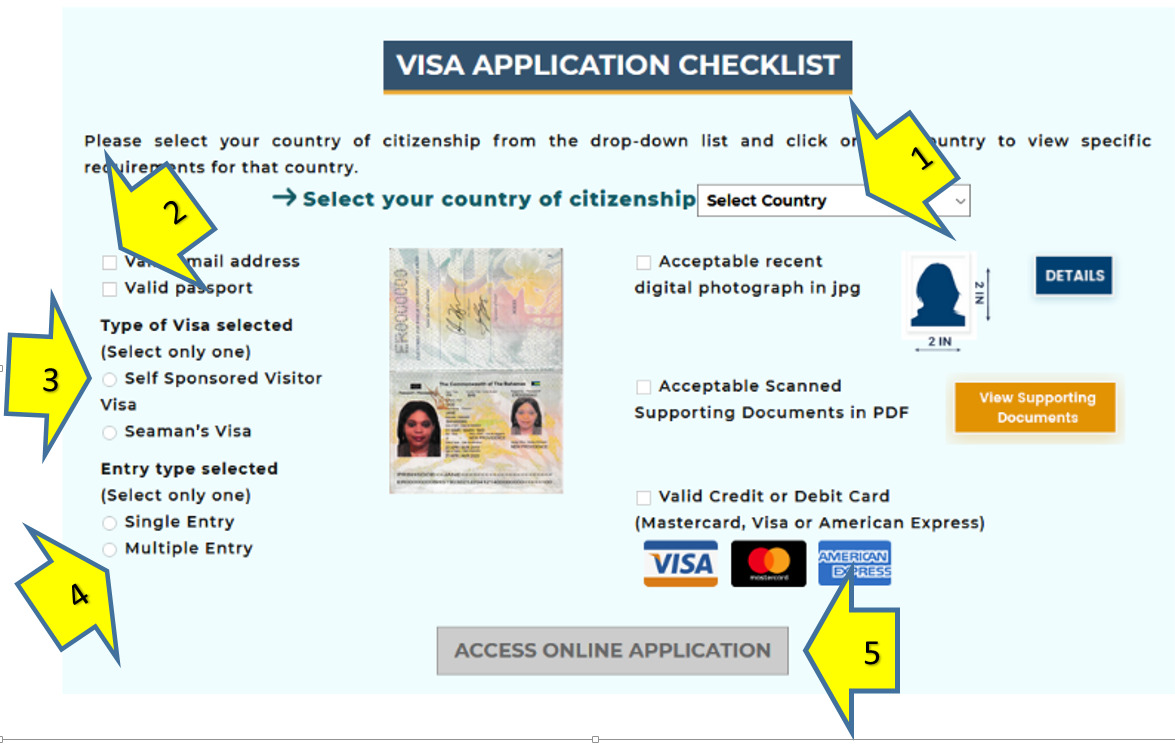
- Scroll down to screen shown, select your country as applicant: CUBA (see arrow 1) and tick on the options they show according to your case (2).
- There is no sponsored visa option for the moment so, even you are not self-sponsored, tick that option to proceed (3).
- While selecting multiple or single visa (4) remember that, multiple entries requires that you have visited Bahamas at least 3 times before and you will need to send your previous visas and travels as a supporting document.
Once you click on everything, the button ACCESS ONLINE APPLICATION will turn available so click it (5). That will lead you to the following url: https://evisa.mofa.gov.bs/bs-evics-entilement-online-ui/
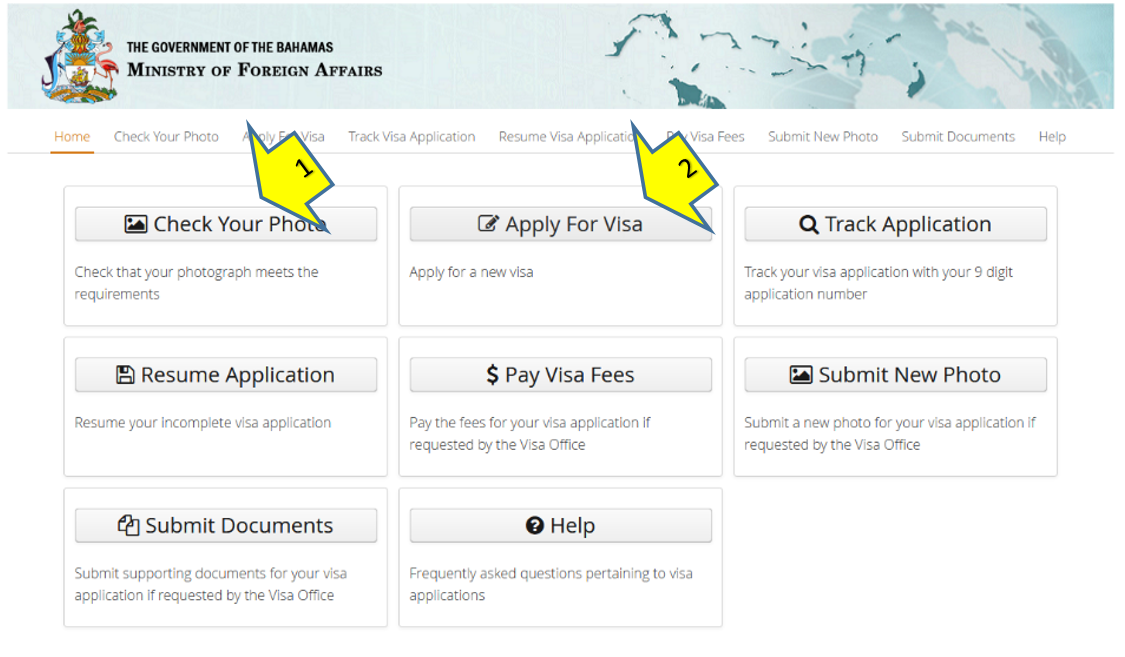
Unless you want to check your picture before applying (1), then click on APPLY FOR VISA
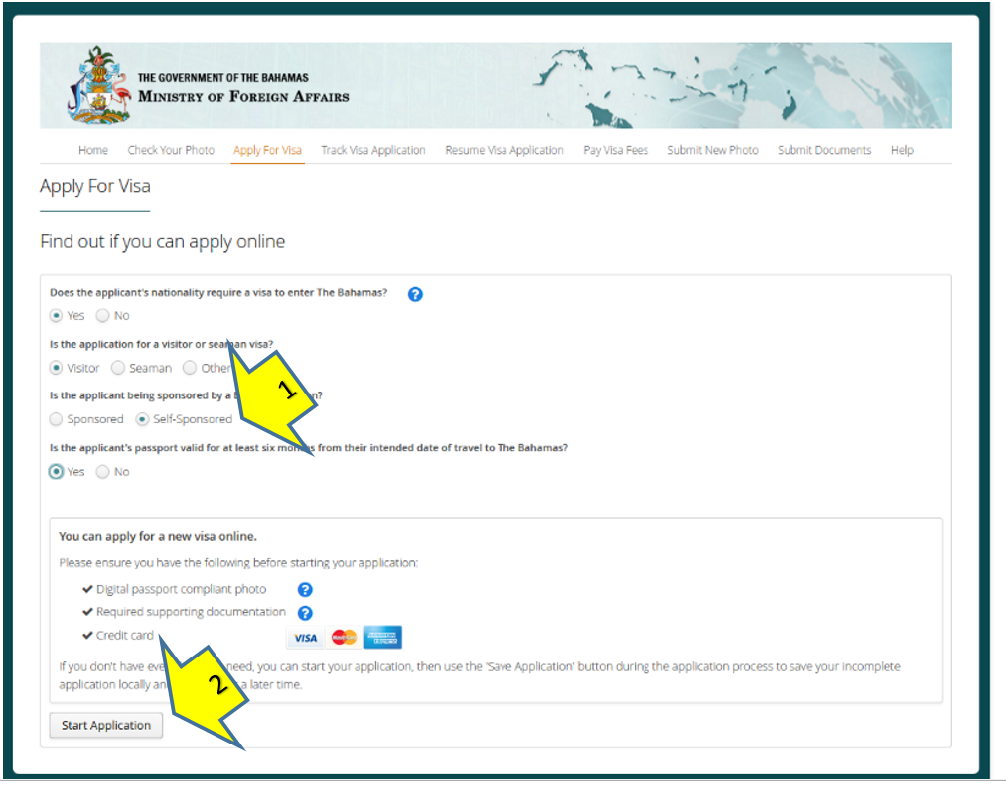
- Comply with the selection that the system shows to you according to your case
- In the option where it says SPONSORED or SELF SPONSORED click on the second option (1) even that is not your case (sponsored option is not available yet, but we are processing sponsored ones using the only option available)
- Click at the bottom on START APPLICATION
2-. THE FORMS
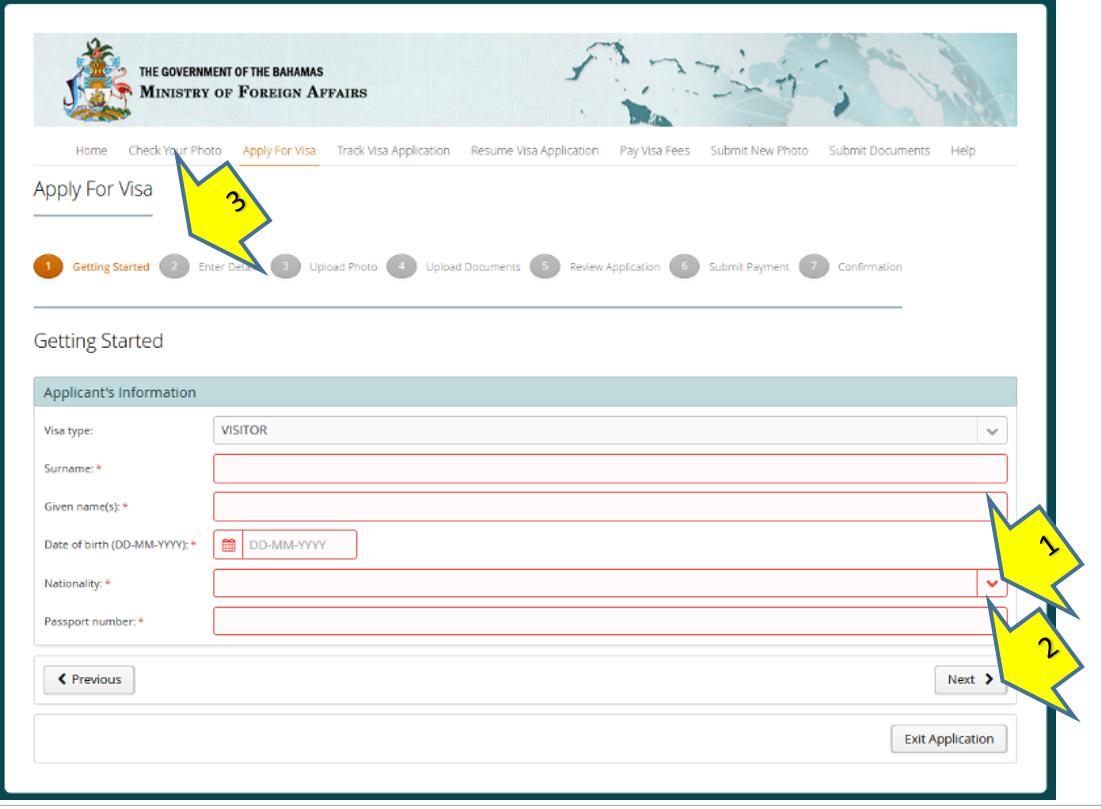
- Fill the boxes according to what they request using your official documents’ data. Some boxes are optional and some are mandatory (shown in red with the symbol *). Some you can freely write and some have and arrow at the end to display and choose (1).
- Once you finish filling the page, press the “Next” button at the right bottom (2) to comply the next information required.
- There is always a step scale on top of the page that shows the stage of the application your are going through (3)
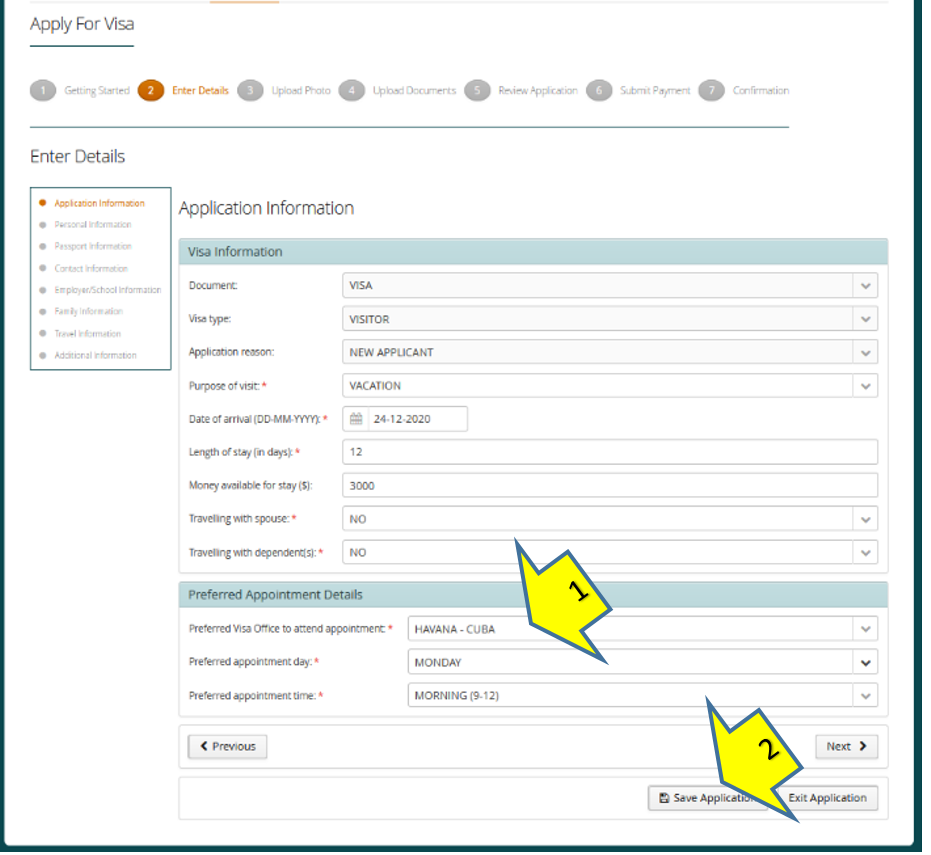
- Remember that even someone else could be filling this application for you, it is supposed that this it is being filled by the applicant. So, the “Preferred Appointment Details” will be filled taking in count that the applicant is in Cuba (1). This part will be used in case the applicant required an interview at the Embassy in Havana.
- If, for any reason, the applicant needs to stop the application, click on “Save Application” (2) before closing the tab. The system will save the information uploaded and will send a link to an address in the computer storage so you can recover it in another moment (not recommendable right now). The best way is to start and finish the application from once.
- Applicant will go through different tabs where information regarding: the application itself, personal information, passport, contacts (personal contact, emergency contacts, staying address and contact in the Bahamas), employment/school, family (spouse, parents, children), travel and some additional information will be required. Please, make sure you have access all those details while filling the forms in each tab.
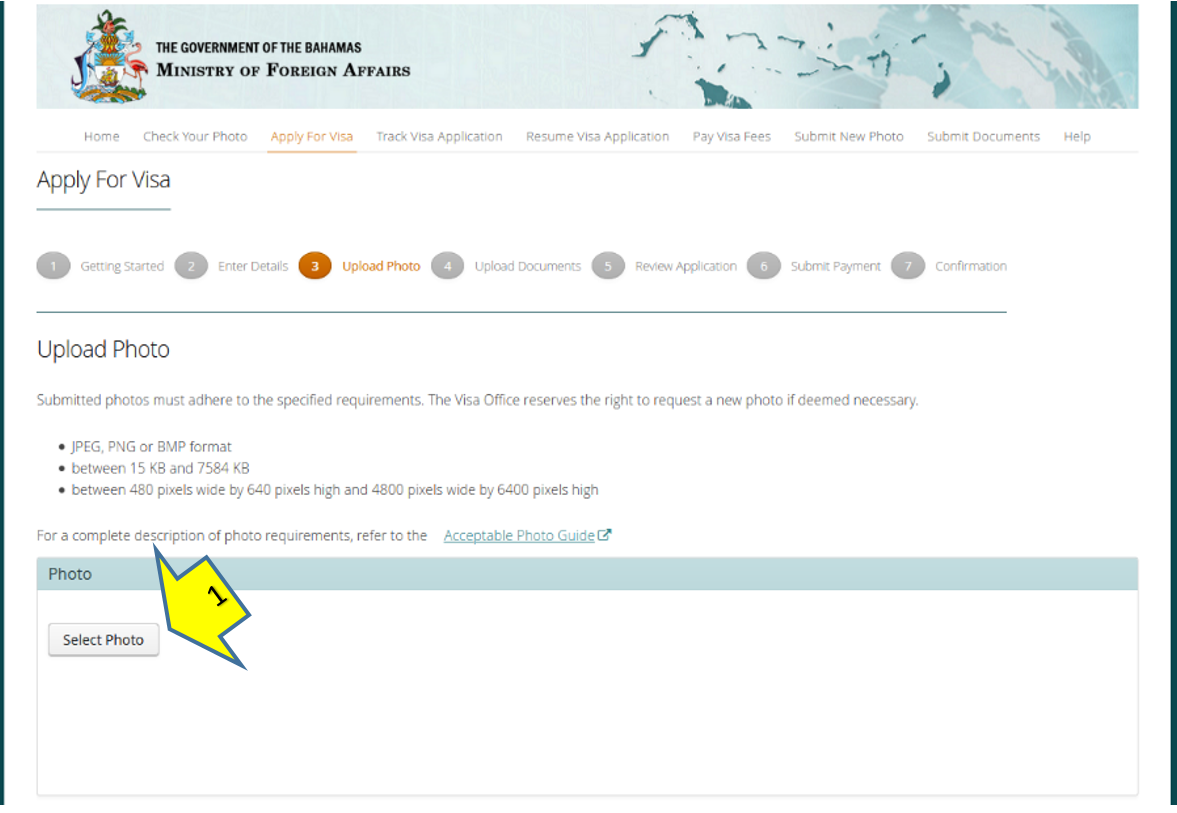
- Once you finish filling the tabs, it is time to upload documents, starting for the picture. Click on the button: “Select Photo” (1) and find the picture that you already got for your application.
- Wait until the system uploads and analyses the picture’s quality and size. If the picture is good, the system will show a green check mark and you can move further.
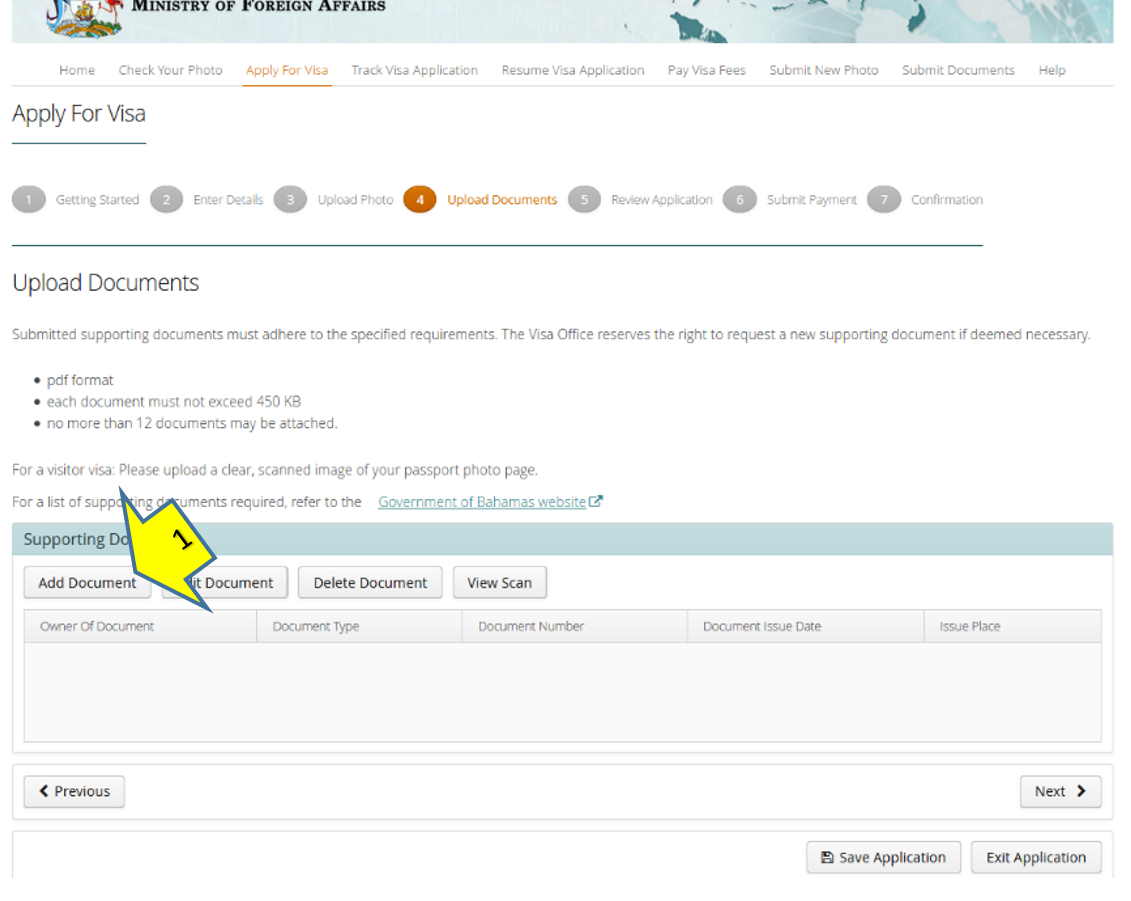
Next step is “Upload Documents”. For this tab you better have all your basic and supporting documents ready: named and organized in a file in your computer or a flash drive so you can upload them in order and without missing any. Here is when you will use what this guide recommended at the very beginning. Again: If the documents are not between the recommended sizes and formats you will not be able to upload them and this will delay the process unnecessarily.
- Press “Add Document” button (See 1 in the previous screenshot). It will pop a new window for each document.
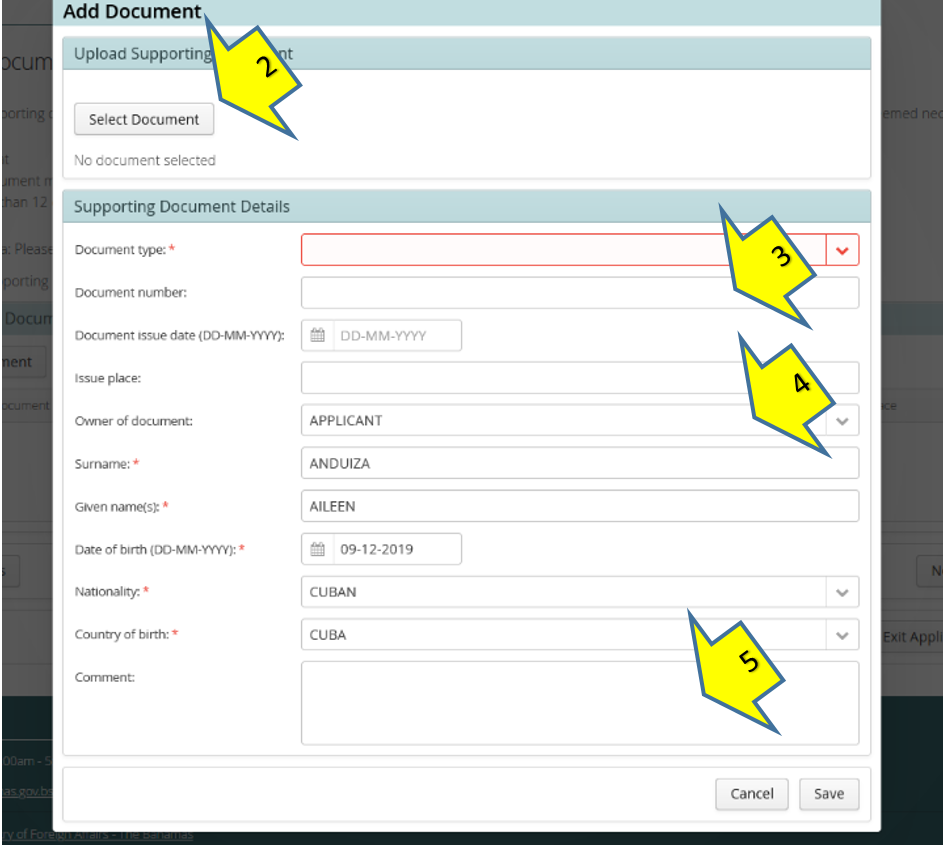
- Press “Select Document” (2) button and find the first document you want to upload.
- Fill the information required, related with each document that you will upload.
- Document number (3) is the legal code or number that some documents have, although it is not a mandatory box as some doesn’t bring any code or number.
- Owner of the document (4) you have to be clear if the document you are uploading is the sponsor’s or the applicant’s. The system will show the applicant’s by default, but this has to be change and filled according to each case. i.e. Letter of invitation is the sponsor’s, Passport pages could be the sponsor’s or the applicant’s.
- Comment (5) is a space to make any extra comment about the uploaded document if the applicant deems necessary.
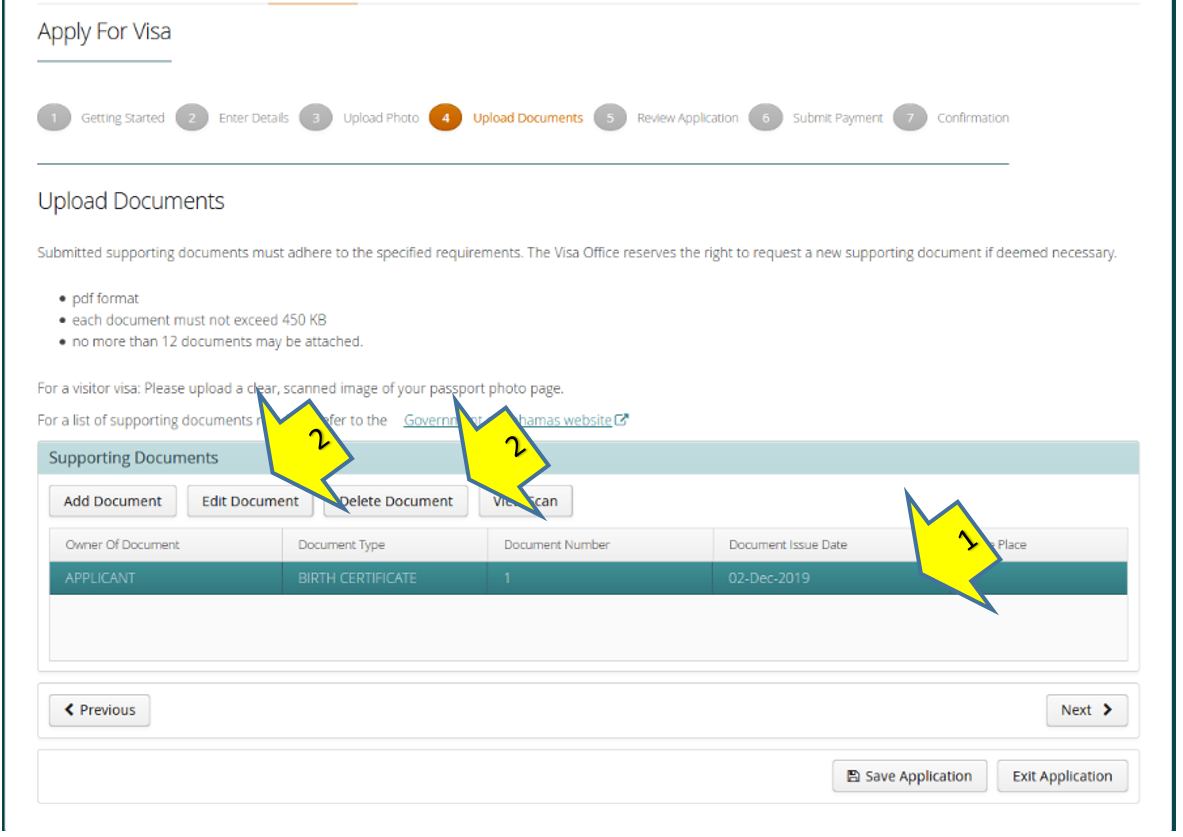
- If, after uploading it, there is something you need to edit or delete, click once on top of the selected document until it turns blue (1) and use the buttons on top according what you need to do (2).
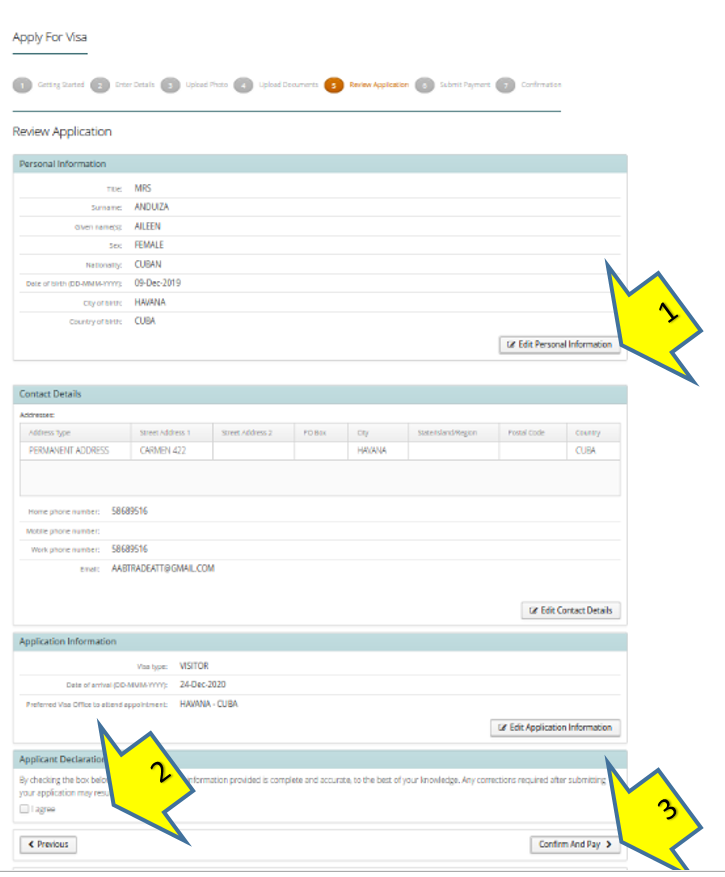
- Next step is to review all the information you have filled.
- Scroll down, check and edit if necessary (1).
- Read the “Applicant Declaration”, tick on I agree (2).
- Cick on “Confirm and Pay” (3).
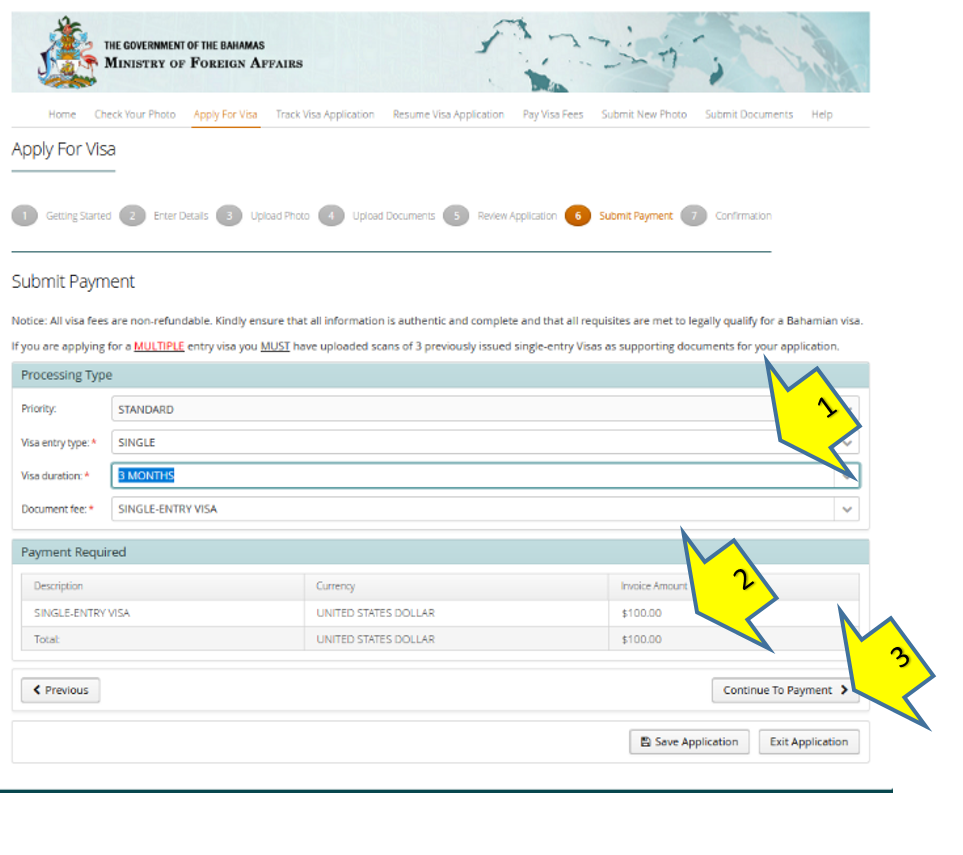
- Fill the information in the next tab (remember not everybody can apply for multiple visa. Make sure you comply with the requirements if that is your case) (1)
- The system will show the fees for the visa application. That money is no refundable no matter the visa outcome (2).
- Click on “Continue to Payment” (3).
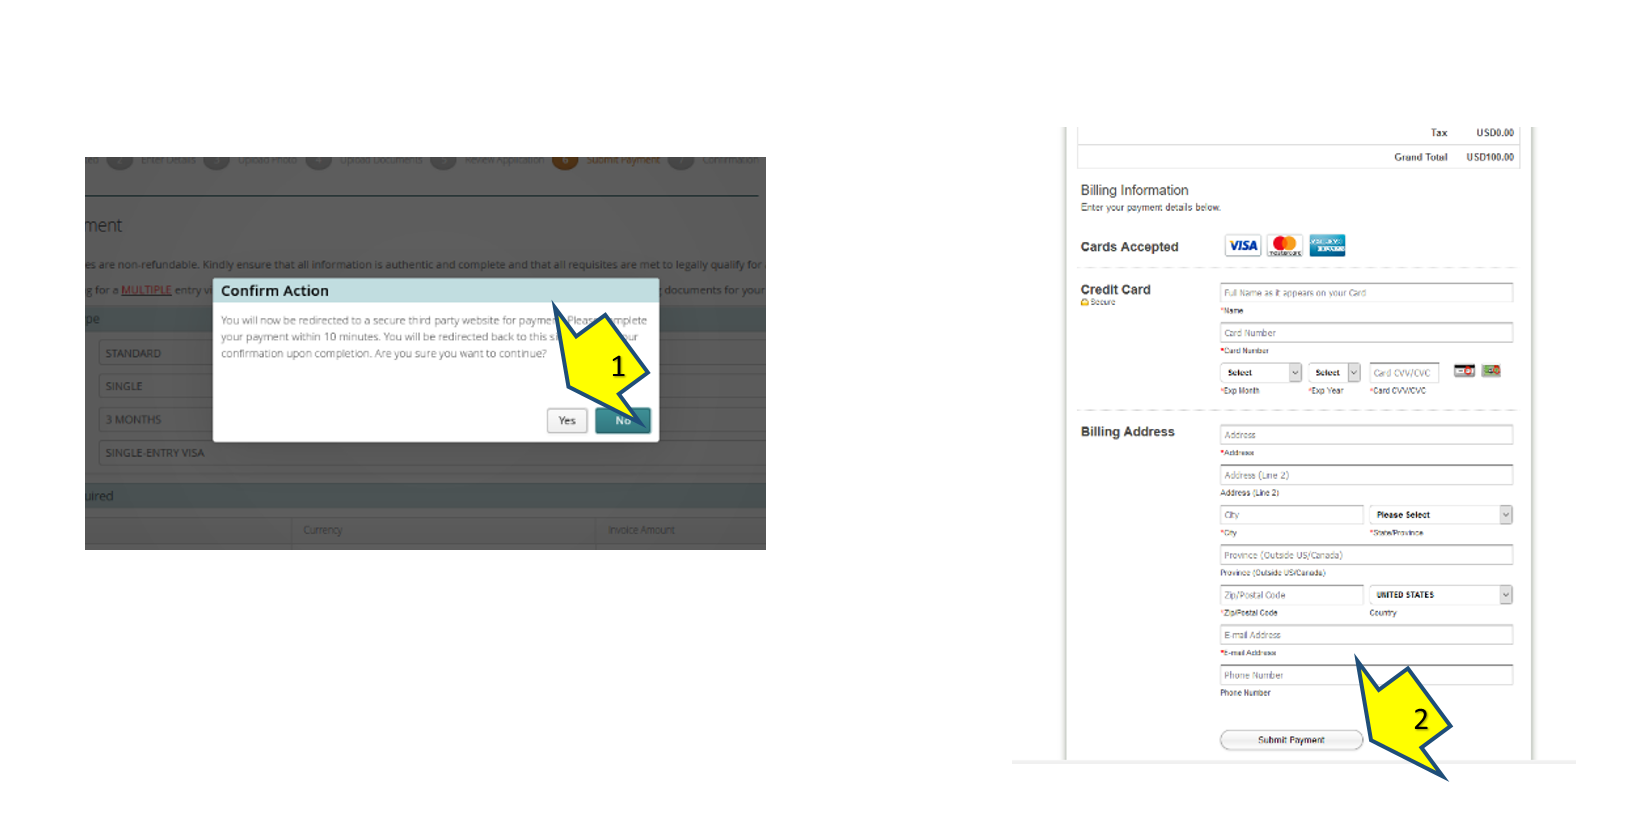
- A WARNING WINDOW will pop up, explaining that you are about to go to a third secure page for payment. Press “YES” to continue (1)
- Fill the payment information as usually for online payments using your debit or credit card.
- Once you finish, click on “Submit Payment” at the bottom (2).
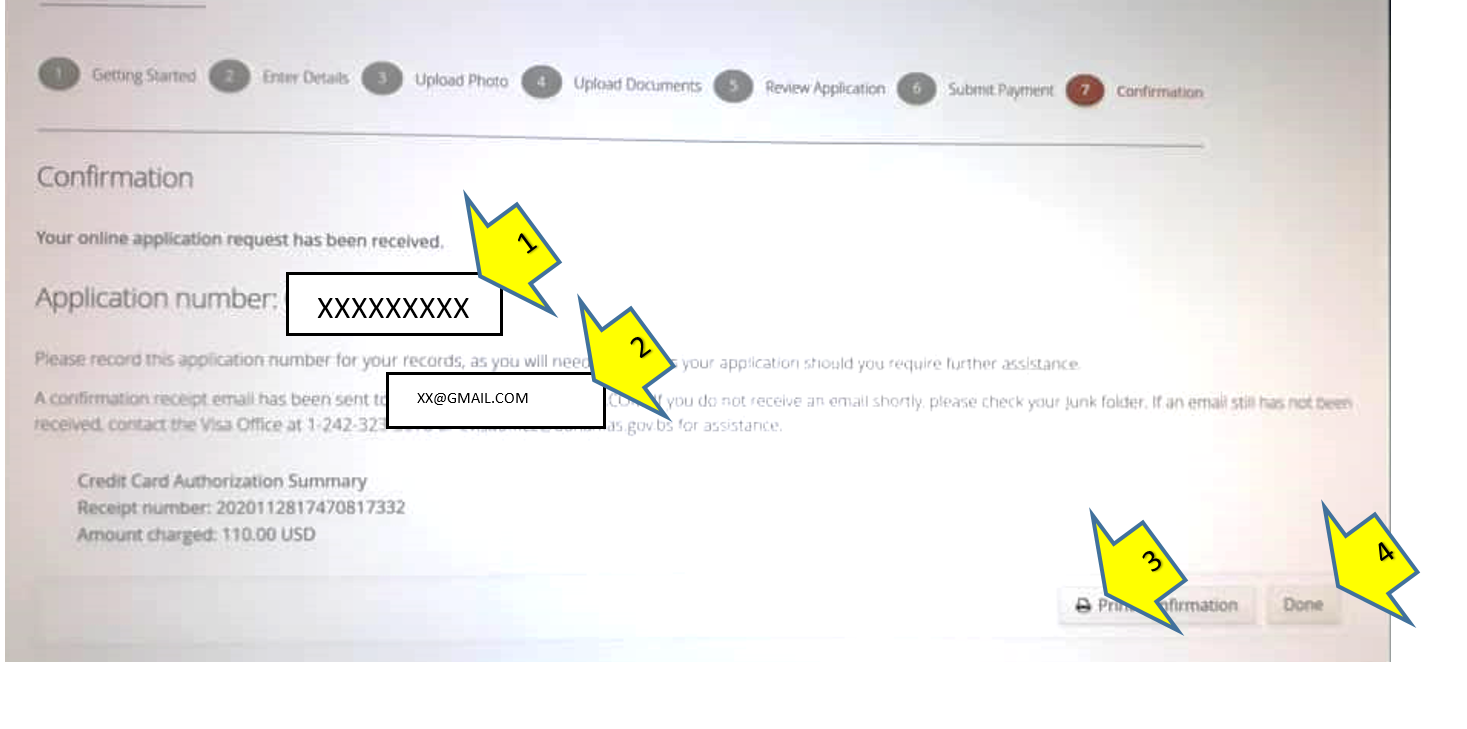
- Last tab will show an Application number (9 digits). Keep it for further references to your application or for tracking it online.
- All the information, extra document required and the visa outcome will be sent to the e-mail address that you gave to the system before (2).
- “Print Confirmation” is not available right now.
- Press “Done” to finish the process (4).
- Wait for an automatic response via email. If you do not receive this automatic response in 24 hours, contact the Consular Division. You might introduced a wrong e-mail during the application.
3-. IF THE MINISTRY OF FOREIGN AFFAIRS DEEMS NECESSARY TO REQUEST ADDITIONAL SUPPORTING DOCUMENTS
- You may receive an e-mail requesting extra documentation.
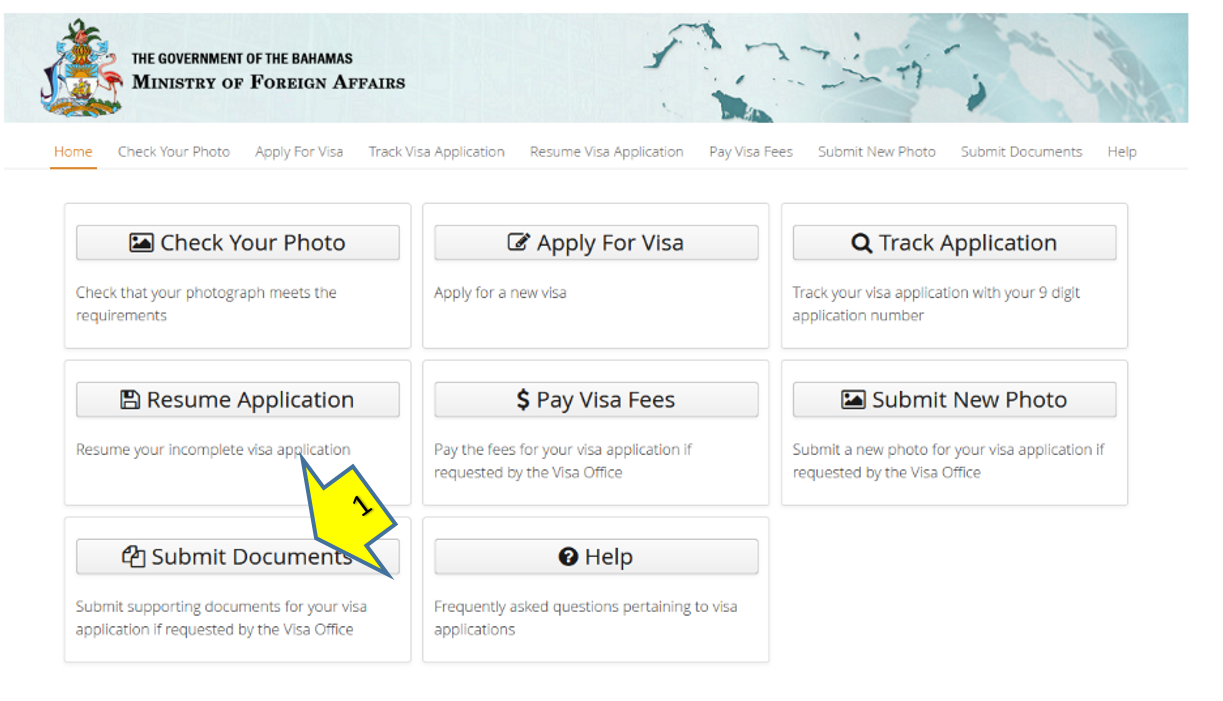
- Go to the link: https://evisa.mofa.gov.bs/bs-evics-entitlement-online-ui/
- Click on SUBMIT DOCUMENTS (1)
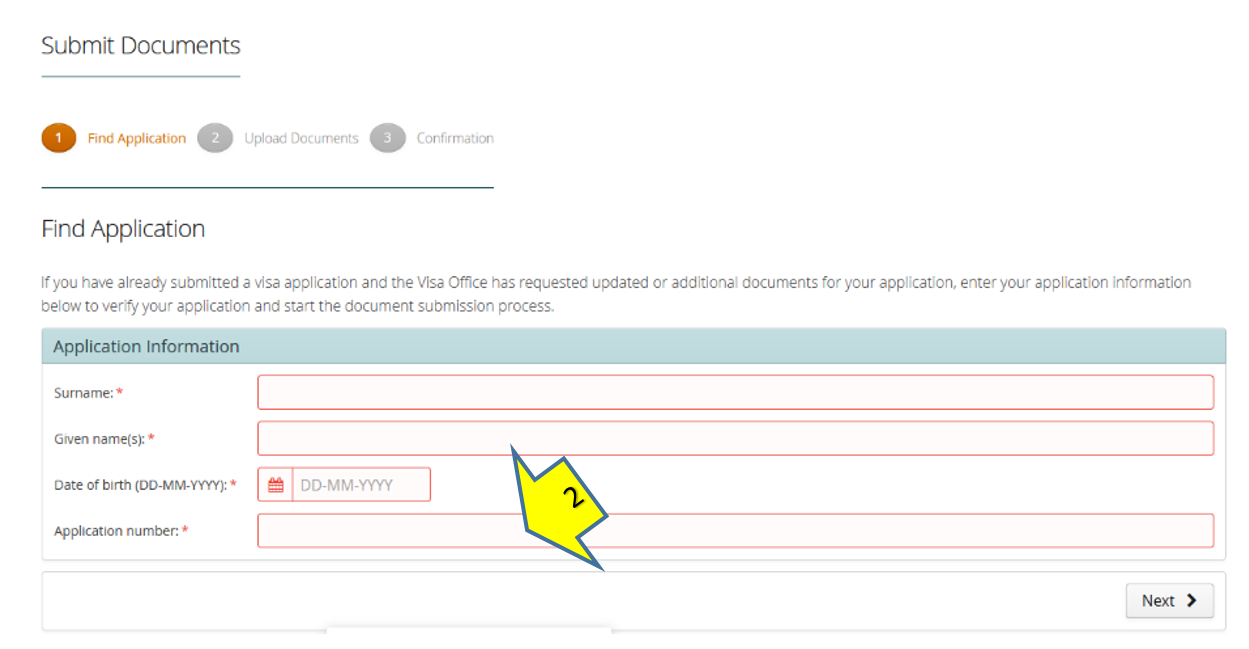
- Fill in the data with the applicant’s information and the 9-digit application number previously assigned to you (2).
- Click ¨Next¨ and upload the extra documents requested by the Consular Division in the same way as you did during your application. You will only be allowed to upload the number of pdf documents requested by the visa office in The Bahamas.
- When you have finished uploading the documents, press DONE and EXIT APPLICATION.
- Wait for the visa outcome.
4- IF THE VISA IS GRANTED
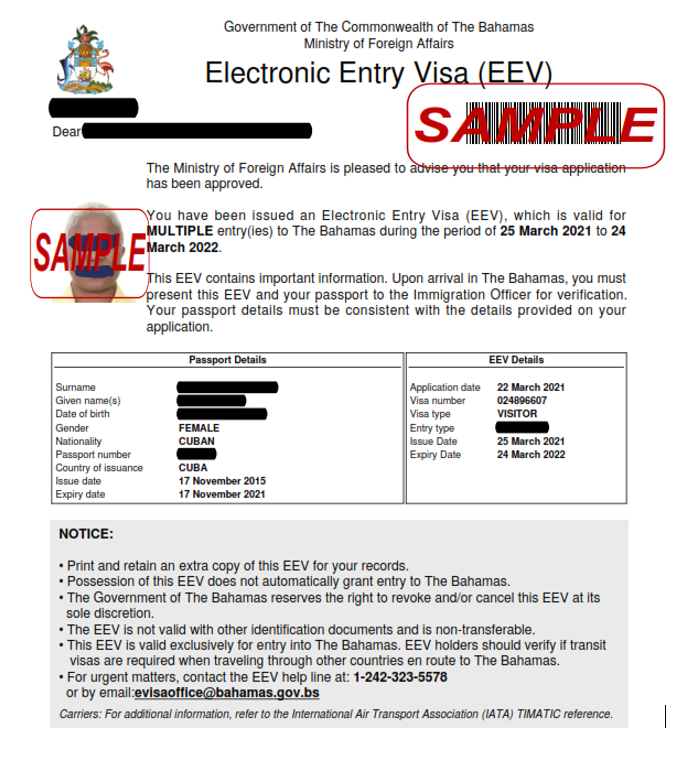
- A document like the one shown above will be sent to your e-mail if your visa is approved. Print it in letter format and bring it with your travel documents to the airport in Cuba and The Bahamas.
- REMEMBER THAT THE TRAVEL VISA IS NOT THE ONLY DOCUMENT REQUIRED FOR TRAVEL. ONCE YOU HAVE YOUR FLIGHT DATE, YOU MUST APPLY FOR A HEALTH VISA. TO LEARN ABOUT THE HEALTH VISA PROCEDURES IN YOUR CASE, VISIT THE RESPECTIVE PAGE ON OUR WEBSITE: https://bahamasembcuba.com/health-visa-visa-de-salud/ OR ON THE BAHAMAS MINISTRY OF TOURISM WEBSITE: https://travel.gov.bs/
Updated 25.11.2021